


 2nd Nov 2016
![]() Posted by Sara Zuboff on
Posted by Sara Zuboff on
Minnesota Dexterity Test Guide and Instructions
The Importance of Dexterity Testing
Dexterity is a skill that most people take for granted until starting to lose function or the need presents itself that dexterity must be measured for the sake of gaining or keeping employment. As a matter of fact, dexterity testing is useful in for the following:
- Physical Therapy: When a patient suffers an injury to the hand or wrist or suffers from a condition like carpal tunnel, a dexterity test can be useful to provide a baseline and track progress throughout their physical therapy rehabilitation.
- Occupational Therapy: When a person suffers from tendon injury in the hand it can affect their ability to flex or extend the hand and fingers. In addition to pain as a result of the injury it can create complications for the patient making it difficult to complete life tasks such as bathing, dressing, grooming, eating, using the bathroom in addition to making it difficult to perform work responsibilities.
- Vocational Application: Vocational assessments can use dexterity testing as one way to measure a prospective student’s ability and aptitude when it comes to tasks similar to those they will find in the workplace of their chosen field of vocational study.
- Pre-Employment Screening: Jobs that require a high level of fine-motor skill such as sewing or manufacturing jobs may use dexterity testing as part of their pre-employment screening process in order to identify candidates with the necessary hand-eye coordination skills.
- Neurological, physiological, and medical researchers: From identifying brain damage, diagnosing dyslexia to furthering research studies in the neurological, physiological, and medical fields, dexterity tests play an important role not just in active rehabilitation but in furthering scientific discovery and innovation.
Dexterity is defined as “skill in performing tasks, especially with the hands”. There have been many dexterity tests created to evaluate and test for dexterity. Dexterity tests are meant to mimic the nature of motor skills based on a specific feature. These are the three features that play a role in dexterity testing:
- The precision of the movement
- Defining the beginning and end points of the movement
- The stability of the environment
There are different dexterity tests on the market, but the Minnesota Manual Dexterity test is one of the few that includes all three of these features.

The Minnesota Manual Dexterity test is simple but effective for evaluating rapid eye-hand-finger movement as well as arm-hand movement and gross motor skills. When measuring gross motor skills: precision of movement is not as important as the successful execution of the skill.
The Minnesota Dexterity test is able to be used in diverse settings from rehabilitation to workplace testing making it one of the most popular dexterity tests available on the market. The Minnesota Dexterity test can be used to evaluate a single person or a group if necessary.
How to Use the Minnesota Dexterity Test
It’s best to have the dexterity test in what is starting position at the beginning of the test. It’s easiest to have the score sheet on the table directly in front of the test subject for easy record keeping of results.
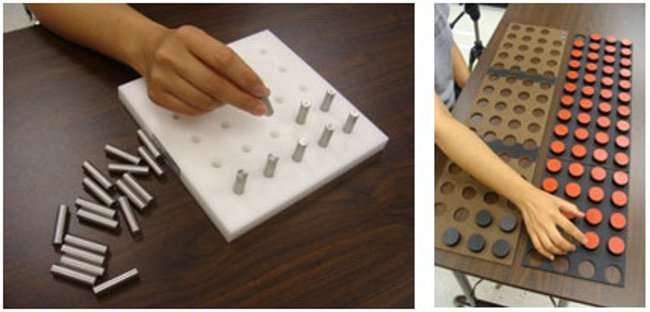
How to put the Minnesota Manual Dexterity Test into Starting Position: Place the testing board on the table about 10 inches from the edge. There are holes in the board for disks. Insert each disk and then lift the board upwards which will allow the disks come through the holes, but remain in straight rows and columns on the table. Now the practitioner will place the testing board in front of the disks on the table. Keep the board about 1 inch from the edge of the table closest to the subject. This is will be starting position. A stop watch is needed in order to time the test.
Before you test: It’s important to give the testing subject instructions on how to complete the test, but also demonstrate the movements in order to make sure they completely understand how to complete the test successfully. There are 4 different tests to choose from:
For Placing test: This test is used to evaluate the speed a subject can put the disks from the top board into bottom board using their dominant hand.
- Start on right side of test board
- Pick up bottom disk and insert it into top hole of board
- Follow with next disk above empty hole on the top board, placing it in the hole below the disk in the bottom board
- Continue pattern in the right column
- Fill the first column of the bottom board downward and then repeat
For Turning test: This test is used to determine the speed in which a subject can pick up disks with one hand and turn them with the other hand before replacing the disks into holes of the testing board.
- Pick up disk form upper right-hand corner with left hand
- Turn disk over while passing it to the right hand and return it into the original hole with bottom side facing up. Continue in that row moving to the left
- Repeat this action for the second row moving towards the right
- Move right to left along board for third row (same as first row) and finally, left to right for fourth row (same as second row)
For Displacing test: This test is used to evaluate how fast the subject can move blocks from one hole to another with either hand. For starting position, remove one disk from the upper left hand corner.
- Begin at upper left-hand corner where disk is removed
- Fill the empty hole with the disk directly below it
- Continue to the bottom leaving the last hole empty
- Then fill bottom hole of first column with bottom disk of second column. Repeat
- Continue this pattern across entire board
For One Hand Turning and Placing Test: This test can determine how fast the testing subject can pick up disks from the top board then turn the disks over and place them into holes of the bottom board using only their dominant hand.
- Begin on the right side of top board
- Pick up bottom disk and insert it into top hole of bottom board, nearest to the subject, while turning the disk over
- Pick up next disk above empty hole of top board and turn it over while placing it in empty hole below first disk in bottom board
- Continue this pattern completing the first row
- Repeat same pattern for consecutive columns moving right to left
During the test: The practitioner will time how long it takes the testing subject to complete the test. For best recordkeeping t’s important to log in the time (in seconds) onto the testing sheet, before moving onto the next trial. Once the subject is finished, simply lift the board up again allowing the disks to fall through the holes. You can then replace the board directly in front of the disks for the starting position of the next trial.
After the test: Once the testing is completed, it’s time to calculate the score. The scores that were recorded on the score sheet can be compared to the Quick Reference Averages provided by the Minnesota Manual Dexterity Test Chart.
The Minnesota Manual Dexterity Test offers diverse testing options making it one of the most diverse dexterity testing devices available. Whether a rehabilitation practitioner, a medical researcher or a human resources professional, the Minnesota Dexterity Test is a great choice for providing valuable information about a subject’s dexterity and skill.
Related Article: Purdue Pegboard Manual Dexterity Test
For more information about popular Physical and Occupational Therapy modalities checkout ProHealthcareProducts.com.