


 25th Apr 2018
![]() Posted by Sara Zuboff on
Posted by Sara Zuboff on
Restoring Your Body's Function After An Injury
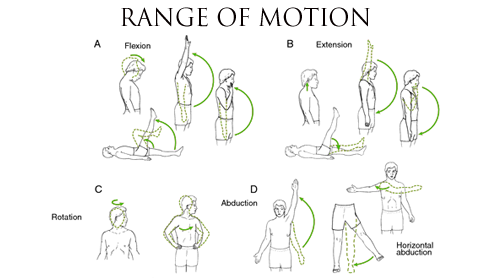
In addition to reducing pain, part of the rehabilitation and recovery process is restoring and improving function. Range of motion, or the measurement of the full movement potential of a joint, plays a large role in functional movement. Not only can chronic pain and injuries negatively impact range of motion, but maintaining full functional movement in a joint is important for overall fitness, aging well and improving athletic performance.

Whether recovering from an injury or looking to enhance athletic skill, when looking to measure range of motion, there are useful tools that can completely measure the movement ability for all the joints of the body. An inclinometer is a measurement device which can be used in clinical and fitness settings to measure both functional and passive range of motion for joints of the body.
On top of choosing the right measurement tool, it’s important to know the correct way to perform joint ROM measurements. The Acumar Inclinometer is a great choice when looking for a ROM measurement tool, because it’s easy to use and can measure all the major joints of the body. We’ve created a user-guide for some of the main joints and ranges of movement that are commonly measured when using the Acumar Inclinometer.
Tips for Achieving Accurate Range of Motion Measurements
- It’s important to perform the test at least 2-5 times. Most practitioners want to test for maximum, minimum and average values.
- Always stabilize the body at the testing area in order to get the most accurate measure.
- Using included accessories to help maximize reliable testing results. For example, the ruler accessory included with the Acumar Inclinometer includes a ruler which allows practitioners to rotate the measurement axis by 90° and read angles with respect to the vertical axis.
The Spine: Cervical Range of Motion
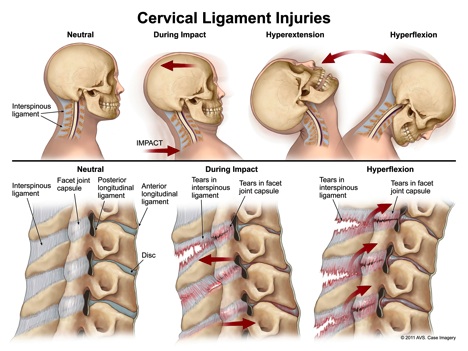
The most common ROM measurements for the cervical spine include flexion and extension. Cervical ROM measurements are important when treating patients with injuries like cervical radiculopathy.
Flexion: When starting, place the testing subject in a neutral position, then place the main unit on the top of the head and then place the secondary unit on the T1 spinous process. Before initiating movement, press the ZERO button before asking the patient to FLEX forward with the head completely. Once they’ve reached their maximum range of motion, press the HOLD button to store the data. You’ll want to repeat the test two to five times, to get an average strength measure.
Extension: Start with the patient in a neutral position with the main unit on the top of the head and then place the secondary unit on the T1 spinous process. Press the ZERO button before asking the patient to EXTEND their head gently backward completely. Once they have reached the maximum range of motion, press the HOLD button to store the data. You’ll want to repeat the test two to five times, to get an average strength measure.
These are the most common measurements for the neck. Other units of measure for the cervical spine include:
- Left and Right lateral movement (follow the above instructions while having the patient flex either left or right)
- Left and Right rotation: (follow the above instructions while having the patient rotate either left or right)
The Spine: Thoracic Range of Motion
When measuring spinal movements, the most common range of motion focus on spinal flexion and extension in the thoracic spine.
Flexion: When starting, place the testing subject in a neutral position, then place the main unit on the T1 spinous process and then place the secondary unit on the T12 spinous process. To start, press the ZERO button before instructing the patient to FLEX forward completely. Wait until they have reached their maximum range of motion, before pressing the HOLD button to store the data. You’ll want to repeat the test two to five times, to get an average strength measure.
Extension: When starting, place the testing subject in a neutral position, then place the main unit on the T1 spinous process and then place the secondary unit on the T12 spinous process. To start, press the ZERO button before instructing the patient to EXTEND forward completely. Wait until they have reached their maximum range of motion, before pressing the HOLD button to store the data. You’ll want to repeat the test two to five times, to get an average strength measure.
These are the most common measurements for the thoracic spine. Other units of measure for the mid-spine include:
- Left and Right lateral movement (follow the above instructions while having the patient flex either left or right)
- Left and Right rotation: (follow the above instructions while having the patient rotate either left or right)
The Spine: Lumbar Range of Motion
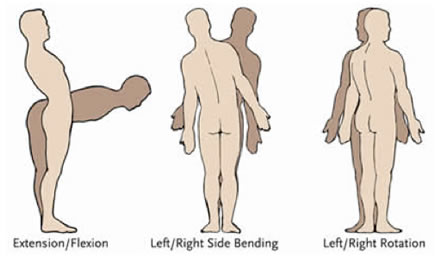
When evaluating patients with low back pain or injury; the most common range of motion measurement is for lumbar spinal flexion and extension.
Flexion: When starting, place the testing subject in a neutral position, then place the main unit on the T12 spinous process and then place the secondary unit on the S1 spinous process. To start, press the ZERO button before instructing the patient to FLEX forward with their torso completely. Wait until they have reached their maximum range of motion, before pressing the HOLD button to store the data. You’ll want to repeat the test two to five times, to get an average strength measure.
Extension: When starting, place the testing subject in a neutral position, then place the main unit on the T12 spinous process and then place the secondary unit on the S1 spinous process. To start, press the ZERO button before instructing the patient to EXTEND backward gently and completely. Wait until they have reached their maximum range of motion, before pressing the HOLD button to store the data. You’ll want to repeat the test two to five times, to get an average strength measure.
These are the most common measurements for the Lumbar spine. Other units of measure for the low-back include:
- Left and Right lateral movement (follow the above instructions while having the patient flex either left or right)
- Left and Right rotation: (follow the above instructions while having the patient rotate either left or right)
Upper Extremities: Shoulder Range of Motion—Left/Right

Shoulder range of motion can be important when treating shoulder injuries like frozen shoulder or rotator cuff tears. The most common measurement for the shoulder is flexion and extension.
Flexion: To start, it’s important to have the patient seated in a neutral position. Place the main unit on the LEFT or RIGHT humerus: for single inclinometry stabilize movement across the shoulders and for dual inclinometry, place the secondary unit on the clavicle. Before movement, push the ZERO button and then instruct the patient to FLEX their LEFT or RIGHT SHOULDER completely. Wait until maximum range of motion has been reached, then press the HOLD button to store the data. Repeat the test two to five times, to get an average strength measure.
Extension: To start, it’s important to have the patient seated in a neutral position. Place the main unit on the LEFT or RIGHT humerus: for single inclinometry stabilize movement across the shoulders and for dual inclinometry, place the secondary unit on the clavicle. Before movement, push the ZERO button and then instruct the patient to EXTEND their LEFT or RIGHT SHOULDER completely. Wait until maximum range of motion has been reached, then press the HOLD button to store the data. Repeat the test two to five times, to get an average strength measure.
These are the most common measurements for the shoulder. Other units of measure for the shoulder include:
- Adduction & Abduction (follow the above instructions while having the patient adduct or abduct either their left or right shoulder)
- External & Internal rotation: (follow the above instructions while having the patient rotate either shoulder or internally)
Upper Extremities: Elbow Range of Motion—Left/Right

Elbow range of motion can be an important unit of measure when treating patients with injuries like tennis elbow.
Flexion: To start, it’s important to have the patient seated in a neutral position. Place the main unit on the LEFT or RIGHT ulna: for single inclinometry stabilize movement in the corresponding humerus and for dual inclinometry, place the secondary unit on the humerus. Before beginning the test, push the ZERO button and then instruct the patient to FLEX their LEFT or RIGHT ELBOW completely. Wait until maximum range of motion has been reached, then press the HOLD button to store the data. Repeat the test two to five times, to get an average strength measure.
Extension: To start, it’s important to have the patient seated in a neutral position. Place the main unit on the LEFT or RIGHT ulna: for single inclinometry stabilize movement in the corresponding humerus and for dual inclinometry, place the secondary unit on the humerus. Before beginning the test, push the ZERO button and then instruct the patient to EXTEND their LEFT or RIGHT ELBOW completely. Wait until maximum range of motion has been reached, then press the HOLD button to store the data. Repeat the test two to five times, to get an average strength measure.
Upper Extremities: Wrist Range of Motion—Left/Right
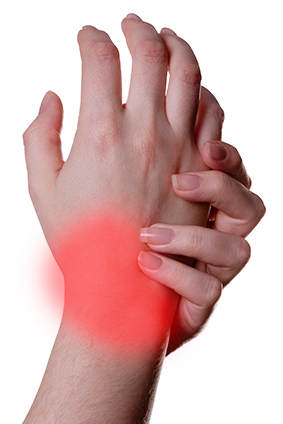
Obtaining wrist range of motion can be important when evaluating skill level in activities that require a swing, such as tennis or when rehabbing injuries like carpal tunnel syndrome.
Flexion: Start patient in a neutral position and place the main unit on their LEFT or RIGHT phalanges. When performing single inclinometry stabilize movement in the corresponding forearm while for dual inclinometry, it’s appropriate to use the secondary unit on the ulna or radius. Before having the patient begin movement, press ZERO and then instruct the patient to FLEX the LEFT or RIGHT WRIST to the end of their range. maximum range of motion has been reached, then press the HOLD button to store the data. Repeat the test two to five times, to get an average strength measure.
Extension: Start patient in a neutral position and place the main unit on their LEFT or RIGHT phalanges. When performing single inclinometry stabilize movement in the corresponding forearm while for dual inclinometry, it’s appropriate to use the secondary unit on the ulna or radius. Before having the patient begin movement, press ZERO and then instruct the patient to EXTEND the LEFT or RIGHT WRIST to the end of their range. maximum range of motion has been reached, then press the HOLD button to store the data. Repeat the test two to five times, to get an average strength measure.
These are the most common measurements for the wrist. Other units of measure for the shoulder include:
- Radial Deviation (follow the above instructions while having the patient deviate either their left or right wrist)
- Ulnar Deviation: (follow the above instructions while having the patient deviate either their left or right wrist)
Lower Extremities: Hip—Left/Right
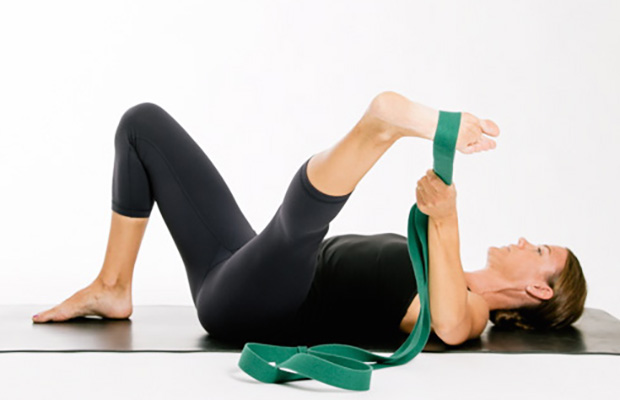
Measuring for hip range of motion is important when working with patients who suffer from progressive conditions like Rheumatoid Arthritis and for improving athletic skills like running.
Flexion: Start patient in a neutral position and place the main unit on their LEFT or RIGHT femur. It’s important to stabilize movement across the entire pelvis. Before having the patient begin movement, press ZERO and then instruct the patient to FLEX their LEFT or RIGHT HIP to the end of their range. maximum range of motion has been reached, then press the HOLD button to store the data. Repeat the test two to five times, to get an average strength measure.
Extension: Start patient in a neutral position and place the main unit on their LEFT or RIGHT femur. It’s important to stabilize movement across the entire pelvis. Before having the patient begin movement, press ZERO and then instruct the patient to EXTEND their LEFT or RIGHT HIP to the end of their range. maximum range of motion has been reached, then press the HOLD button to store the data. Repeat the test two to five times, to get an average strength measure.
These are the most common measurements for the hip. Other units of measure for both hips include:
- Adduction & Abduction (follow the above instructions while having the patient adduct or abduct either their left or right hip)
- External & Internal rotation: (follow the above instructions while having the patient rotate either hip externally or internally)
Lower Extremities: Hip—Left/Right Knee
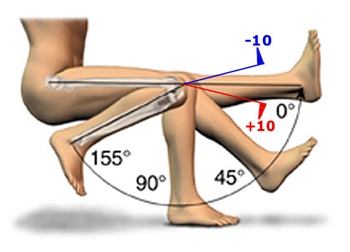
Lower extremity ROM measurements of the knees can help when treating patient’s recovering from joint replacement.
Flexion: Begin with the patient neutral position and place the main unit on their LEFT or RIGHT tibia. When performing single inclinometry stabilize movement in the upper leg and to perform dual inclinometry, it’s appropriate to use the secondary unit on the corresponding femur. Start the test by pressing ZERO and then instruct the patient to FLEX their LEFT or RIGHT KNEE to the end of their range. maximum range of motion has been reached, then press the HOLD button to store the data. Repeat the test two to five times, to get an average strength measure.
Extension: Begin with the patient neutral position and place the main unit on their LEFT or RIGHT tibia. When performing single inclinometry stabilize movement in the upper leg and to perform dual inclinometry, it’s appropriate to use the secondary unit on the corresponding femur. Start the test by pressing ZERO and then instruct the patient to EXTEND their LEFT or RIGHT KNEE to the end of their range. maximum range of motion has been reached, then press the HOLD button to store the data. Repeat the test two to five times, to get an average strength measure.
Lower Extremities: Ankle—Left/Right
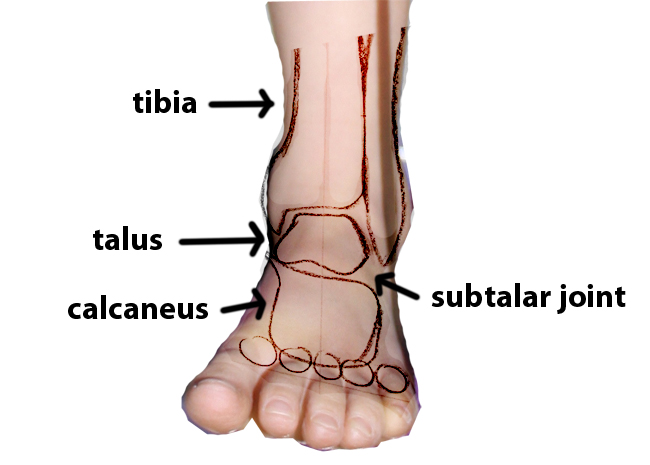
ROM measurements of the ankles can help trainers create appropriate regimens for increasing skill in athletes like runners and basketball players, while it can also help physical therapists help create treatment plans for patients with gait issues.
Flexion: Begin with the patient neutral position and place the main unit on the bottom of the patient’s LEFT or RIGHT foot. When performing single inclinometry stabilize movement in the lower leg and for dual inclinometry place the secondary unit on the corresponding tibia. Start the test by pressing ZERO and then instruct the patient to FLEX their LEFT or RIGHT ANKLE to the end of their range. maximum range of motion has been reached, then press the HOLD button to store the data. Repeat the test two to five times, to get an average strength measure.
Extension: Flexion: Begin with the patient neutral position and place the main unit on the bottom of the patient’s LEFT or RIGHT foot. When performing single inclinometry stabilize movement in the lower leg and for dual inclinometry place the secondary unit on the corresponding tibia. Start the test by pressing ZERO and then instruct the patient to EXTEND their LEFT or RIGHT ANKLE to the end of their range. maximum range of motion has been reached, then press the HOLD button to store the data. Repeat the test two to five times, to get an average strength measure.
These are the most common measurements for the ankle. Other units of measure for the ankle include:
- Inversion and Eversion (follow the above instructions while having the patient invert or evert either their left or right wrist)